Fail2Ban, which is a completely free, open-source intrusion prevention tool written in Python, protects systems against brute force attacks. The focus of this guide is on how to secure SSH access with Fail2Ban. In this situation, Fail2Ban will monitor for multiple attempts to log into your system with bad authentication and block the IP that made the attempts. This makes it a great choice for protecting SSH and other services that cybercriminals commonly target.
Fail2Ban is a very useful tool for safeguarding servers against brute-force attacks through monitoring log files like /var/log/auth.log and /var/log/apache/access.log. When Fail2Ban discovers multiple failed login attempts, the source IP address will be rejected for a predetermined amount of time. Fail2Ban can ban sources by altering firewall settings, modifying TCP Wrapper settings, sending notification emails, or executing user-defined actions.
To install Fail2Ban on your server first you have to check that do you have administrative privileges. Once you confirmed that , you can go for installation of this using package manager.For example, on ubuntu server:
sudo apt-get install fail2ban -y
Checking the status :
sudo systemctl status fail2ban
You can see it’s in loaded state so now fire this command to start service :
sudo systemctl start fail2ban
The main file for configuring Fail2Ban is jail.conf, which is present in /etc/fail2ban directory.It provides various options to configure different services like HTTP, SSH, Web App. and others.
It is recommended to create a custom files for each jail in /etc/fail2ban/jail.d directory.
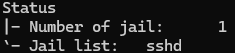
On ubuntu, Fail2Ban is automatically configure and enable SSH jail by default upon installation. So if you are ubuntu user then verify this using below command :
sudo fail2ban-client status
If you are using different distribution of the linux then may be SSH jail is not created by default and additionally if you want to manually configure jail which is already created then we can create a sshd.conf file in /etc/fail2ban/jail.d directory.
					[sshd]
enabled = true
port = ssh
filter = sshd
logpath = /var/log/auth.log
maxretry = 5
bantime = 300
ignoreip = whitelist-IP
After creating this configuration file we must need to restart the service using this command :
sudo systemctl restart fail2ban
Firstly to get banned ips we run this command which reveals overall status of jail :
sudo fail2ban-client status sshd
After getting banned ip adress we need to fire this command to unban that ip address :
sudo fail2ban-client set sshd unbanip <IP_ADDRESS>
Securing remote access is critical for keeping a safe Linux server environment. With Fail2Ban, administrators can Secure SSH Access with Fail2Ban by monitoring and preventing brute-force login attacks and IP addresses. Indeed, Fail2Ban is a highly efficient security tool for securing remote Linux computer access and therefore ought to be used for securing remote Linux computer access.
We are a leading tech company dedicated to crafting innovative digital solutions for businesses worldwide. At Triosphere Tech, we believe in the power of technology to transform ideas into reality and drive growth.